SIM Management
A SIM Swap is a process performed to move a subscriber’s subscription (including all of their bundles and settings) and MSISDN from one SIM card to new one.
It is useful in the following situations:
– A SIM (or a handset with the SIM inside) has been lost or stolen
– Their SIM has become damaged (i.e. worn from switching devices too often, or water damage)
– The subscriber is using a uSIM (3G-only SIM) and wants to benefit from 4G/5GNSA by upgrading to an iSIM
– The subscriber changes device and the format of the SIM is incompatible in the new device (Mini / Micro / Nano / eSIM) or the plastic frame has been lost to increase the size (i.e. from Micro to Mini SIM) according to the handset SIM card tray
– A fault is suspected on the SIM card and a swap is used to rule out/fix this type of anomaly
– (eSIM) the eSIM profile has been deleted from the device
See the different types of SIM here.
All types of Transatel SIMs can be swapped between each other according to the needs of the Subscriber and their devices:
– Physical SIM to Physical SIM
– Physical SIM to eSIM
– eSIM to Physical SIM
– eSIM to eSIM
1. Find an available Swap SIM
The Swap SIM is the SIM that will receive the subscriber’s subscriptions and MSISDN at the end of the process.
This will correspond to any of your available SIMs without an MSISDN paired to the SIM. You can use the search functions to filter available SIMs from your entire fleet, and sort by MSISDN to find a SIM that does not have one.
You may want to swap to a physical SIM or an eSIM as highlighted below.
Note the ICCID of the SIM that you want to use for swap.
2. Go to the subscriber’s current active SIM
Go to Auriga and search for the Subscriber’s line (the old one that will be replaced at the end of this process).
3. On the top-right hand corner, select Other actions > Change SIM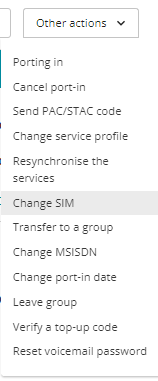
4. Enter the ICCID of the Swap SIM (noted in step 1) into the prompt and click confirm
5. Track the action by going to the page for the Swap SIM in Auriga.
When the SIM Swap is complete, the old SIM will be terminated, and the new SIM will automatically activate.
6. Install the SIM
If using a physical SIM, you can insert the new SIM in the phone at any point of the SIM swap process. In any case, it is important to insert the SIM rapidly after having completed Step 4, so that the new SIM can receive the correct SIM settings via Over the Air Updates.
7. What to do when you have an eSIM
Depending on your offer, there are different steps to take.
If you are a UK MVNO:
When using an eSIM, it is best practice to download the eSIM uniquely when the process has completed and the eSIM has been fully activated on the network. Otherwise, the phone will need to be restarted once the Swap process has completed (and the eSIM is active).
If you are a French MVNO:
First, you must scan the QR code of the eSIM. Once the QR has been downloaded, you can then make the SIM Swap request.
See the eSIM quickstart guide. It is also best practice now to perform a refresh.